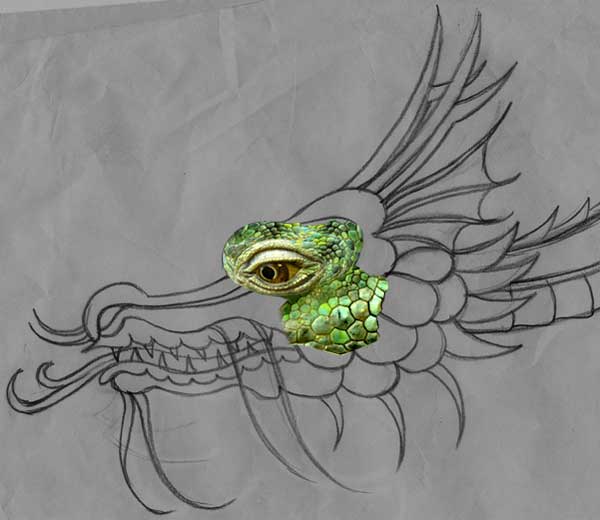
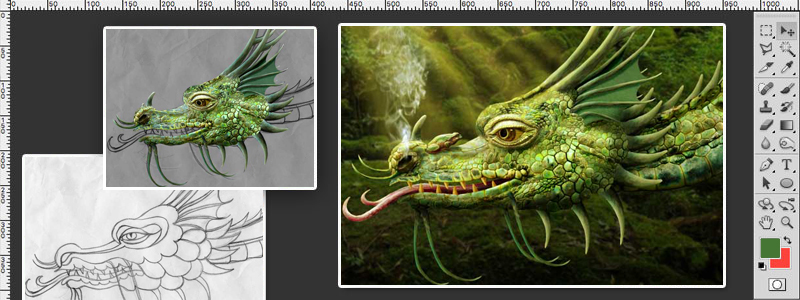
I had tried several times previously to create a dragon, starting with an iguana or a crocodile, but it always ended up looking like a distorted iguana or crocodile and I binned it, so this time I started with a scanned pencil drawing of a dragon:
These are all the source images I used:

Apart from the teeth, tongue and membrane of the ears, the entire dragon was made from bits of the iguana head, which I flipped horizontally to match the direction of the drawing before selecting bits of it to use. The important thing is to find large, high-quality images, especially when you are going to chop a lot of bits out of them and distort them.
I began selecting the iguana’s eye and placing it on the drawing. We all have our favourite ways of making selections and I tend to use the Lasso tool to cut things out roughly, then I use a small, soft-edged eraser to clean up the edges:

To change the direction of the eye I selected the pupil and iris, copied them, moved them forward and erased the front part to fit the eye, then I used a small Clone tool to paint over the original eye with the colour and texture of the eyeball area, which was a bit fiddly, as there was not much to work with.
I find that working on a white background is a bit stark and distracting, so I placed a grey layer below the drawing and changed the drawing itself to a Multiply layer. I then started selecting suitable areas of the iguana to build up the dragon’s head, scaling and warping the selections to fit as I went along:

You will notice that I used the cheek area of the iguana quite a few times as it had the best scaly texture.
I continued building up the different areas, using the iguana’s nostril and mouth, scaling and warping each element to fit before moving on to the next:

I selected and imported the horn from the iguana’s nose and placed it on the nose of the dragon, stretching and warping it slightly to make it longer and sharper. I then duplicated the horn to build up all the other horned pieces, scaling, stretching warping and erasing edges as appropriate. Even the thin, trailing bits were made from the same source:

The membrane between the horny elements that make up the ears was taken from a bat’s wing and cut to fit the area, then I used Hue/Saturation to adjust the colour to blend in with the green of the rest of the head, and duplicated it and darkened it for the other ear.
The tongue was created from a selection from inside another iguana’s mouth, stretched, warped and cut to fit the drawing. The teeth were all made from one crocodile tooth:

The neck was created in the same way as the head from the iguana cheek for the top of the neck and the mouth for the underside, scaling and warping them to fit. The spines down the back were simply copies of one of the horns on the side of the head scaled and warped to fit. I also added the frog at this point. I left the frog the same colour as the dragon because I wanted the viewer to look closely at the image to spot it:

I got rid of the drawing and darkened the background to make the dragon stand out more. I flattened all the elements of the head and neck and Ctrl/clicked on the thumbnail of the head layer to select it. Then I created a Multiply layer on top and used a soft-edged, black brush to paint in all the shadows, smudging where necessary to get the right effect. The selection meant that I could not stray outside the area of the head while painting. I then played with the opacity of the shadow layer until it looked right at about 75 per cent.
On top of the Multiply layer I created a Screen layer and, with the head area still selected, I used a light yellow colour to paint in all the highlights, lowering the opacity to about 80 per cent.
I added the background layer with a slight Gaussian blur. I then placed a dull green Multiply layer on top at about 25 per cent opacity, and another Multiply layer on top of that with a top to bottom white to black gradient at full opacity. The purpose of these layers was to make sure the background did not compete with the dragon. They might not always be necessary, and can be varied in colour and strength according to the individual needs of the image.
Finally I painted in the sunlight on a Screen layer below the dragon and frog, blurring it and lowering the opacity until it looked right, and added the smoke on another screen layer above the dragon:

Finally I added a yellow Overlay layer on top of everything at about 25 per cent to give a warm colour uniformity to the whole image.
There are many other ways to achieve the same results, but I can only tell you how I created this particular image. I hope it’s of some use.
Photoshop tutorial by bajazet originally posted on Worth1000.
Looking for more tutorials, try this one for creating a cyborg leopard or visit blog.designcrowd.com/tag/tutorial for more helpful hints and tips to boost your designer skills
Written by DesignCrowd on Thursday, May 25, 2017
DesignCrowd is an online marketplace providing logo, website, print and graphic design services by providing access to freelance graphic designers and design studios around the world.

