Google Analytics is great, but not everyone in your organization will be granted access. In many places I’ve worked, it was on a kind of “need to know” basis.
In this article, I’m gonna flip that on its head and show you how I wrote a GitHub Action that queries Google Analytics, generates a top ten list of the most frequently viewed pages on my site from the last seven days and compares them to the previous seven days to tell me which pages have increased in views, which pages have decreased in views, which pages have stayed the same and which pages are new to the list.
The report is then nicely formatted with icon indicators and posted to a public Slack channel every Friday at 10 AM.
Not only would this surfaced data be useful for folks who might need it, but it also provides an easy way to copy and paste or screenshot the report and add it to a slide for the weekly company/department meeting.
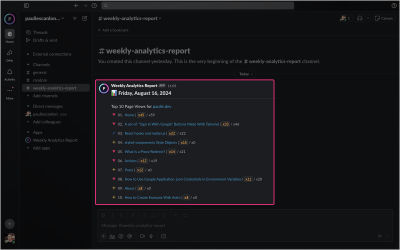
Here’s what the finished report looks like in Slack, and below, you’ll find a link to the GitHub Repository.
GitHub
To use this repository, follow the steps outlined in the README.
Prerequisites
To build this workflow, you’ll need admin access to your Google Analytics and Slack Accounts and administrator privileges for GitHub Actions and Secrets for a GitHub repository.
Customizing the Report and Action
Naturally, all of the code can be changed to suit your requirements, and in the following sections, I’ll explain the areas you’ll likely want to take a look at.
Customizing the GitHub Action
The file name of the Action weekly-analytics.report.yml isn’t seen anywhere other than in the code/repo but naturally, change it to whatever you like, you won’t break anything.
The name and jobs: names detailed below are seen in the GitHub UI and Workflow logs.
The cron syntax determines when the Action will run. Schedules use POSIX cron syntax and by changing the numbers you can determine when the Action runs.
You could also change the secrets variable names; just make sure you update them in your repository Settings.
# .github/workflows/weekly-analytics-report.yml

name: Weekly Analytics Report

on:
  schedule:
    - cron: '0 10 * * 5' # Runs every Friday at 10 AM UTC
  workflow_dispatch: # Allows manual triggering

jobs:
  analytics-report:
    runs-on: ubuntu-latest

    env:
      SLACK_WEBHOOK_URL: $ secrets.SLACK_WEBHOOK_URL
      GA4_PROPERTY_ID: $ secrets.GA4_PROPERTY_ID
      GOOGLE_APPLICATION_CREDENTIALS_BASE64: $ secrets.GOOGLE_APPLICATION_CREDENTIALS_BASE64

    steps:
      - name: Checkout repository
        uses: actions/checkout@v4

      - name: Setup Node.js
        uses: actions/setup-node@v4
        with:
          node-version: '20.x'

      - name: Install dependencies
        run: npm install

      - name: Run the JavaScript script
        run: node src/services/weekly-analytics.js
Customizing the Google Analytics Report
The Google Analytics API request I’m using is set to pull the fullPageUrl and pageTitle for the totalUsers in the last seven days, and a second request for the previous seven days, and then aggregates the totals and limits the responses to 10.
You can use Google’s GA4 Query Explorer to construct your own query, then replace the requests.
// src/services/weekly-analytics.js#L75

const [thisWeek] = await analyticsDataClient.runReport(
  property: `properties/$process.env.GA4_PROPERTY_ID`,
  dateRanges: [

      startDate: '7daysAgo',
      endDate: 'today',
    ,
  ],
  dimensions: [

      name: 'fullPageUrl',
    ,

      name: 'pageTitle',
    ,
  ],
  metrics: [

      name: 'totalUsers',
    ,
  ],
  limit: reportLimit,
  metricAggregations: ['MAXIMUM'],
);
Creating the Comparisons
There are two functions to determine which page views have increased, decreased, stayed the same, or are new.
The first is a simple reduce function that returns the URL and a count for each.
const lastWeekMap = lastWeekResults.reduce((items, item) =>
  const  url, count  = item;
  items[url] = count;
  return items;
, );
The second maps over the results from this week and compares them to last week.
// Generate the report for this week
const report = thisWeekResults.map((item, index) =>
  const  url, title, count  = item;
  const lastWeekCount = lastWeekMap[url];
  const status = determineStatus(count, lastWeekCount);

  return
    position: (index + 1).toString().padStart(2, '0'), // Format the position with leading zero if it's less than 10
    url,
    title,
    count: , // Ensure lastWeekCount is displayed as '0' if not found
    status,
  ;
);
The final function is used to determine the status of each.
// Function to determine the status
const determineStatus = (count, lastWeekCount) =>  lastWeekCount === '0')
    return NEW;


  if (thisCount > previousCount)
    return HIGHER;


  if (thisCount < previousCount)
    return LOWER;


  return SAME;
;
I’ve purposely left the code fairly verbose, so it’ll be easier for you to add console.log to each of the functions to see what they return.
Customizing the Slack Message
The Slack message config I’m using creates a heading with an emoji, a divider, and a paragraph explaining what the message is.
Below that I’m using the context object to construct a report by iterating over comparisons and returning an object containing Slack specific message syntax which includes an icon, a count, the name of the page and a link to each item.
You can use Slack’s Block Kit Builder to construct your own message format.
// src/services/weekly-analytics.js#151

    const slackList = report.map((item, index) => {
      const
        position,
        url,
        title,
        count:  thisWeek, lastWeek ,
        status,
       = item;

      return
        type: 'context',
        elements: [

            type: 'image',
            image_url: `$reportConfig.url/images/$status`,
            alt_text: 'icon',
          ,

            type: 'mrkdwn',
            text: `$position.  <$url,
        ],
      ;
    });
Before you can run the GitHub Action, you will need to complete a number of Google, Slack, and GitHub steps.
Ready to get going?
Creating a Google Cloud Project
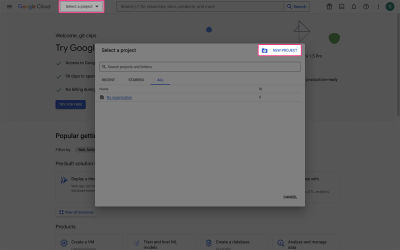
Head over to your Google Cloud console, and from the dropdown menu at the top of the screen, click Select a project, and when the modal opens up, click NEW PROJECT.
Project name
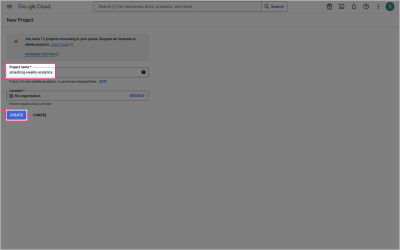
On the next screen, give your project a name and click CREATE. In my example, I’ve named the project smashing-weekly-analytics.
Enable APIs & Services
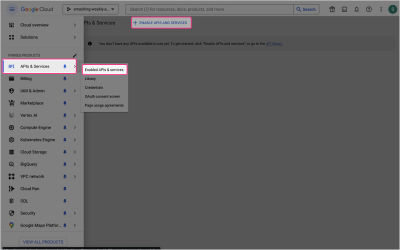
In this step, you’ll enable the Google Analytics Data API for your new project. From the left-hand sidebar, navigate to APIs & Services > Enable APIs & services. At the top of the screen, click + ENABLE APIS & SERVICES.
Enable Google Analytics Data API
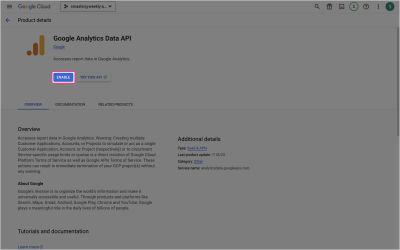
Search for “Google analytics data API,” select it from the list, then click ENABLE.
Create Credentials for Google Analytics Data API
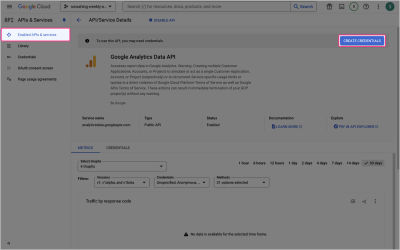
With the API enabled in your project, you can now create the required credentials. Click the CREATE CREDENTIALS button at the top right of the screen to set up a new Service account.
A Service account allows an “application” to interact with Google APIs, providing the credentials include the required services. In this example, the credentials grant access to the Google Analytics Data API.
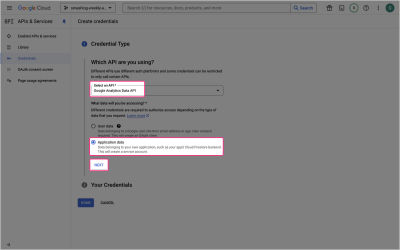
Service Account Credentials Type
On the next screen, select Google Analytics Data API from the dropdown menu and Application data, then click NEXT.
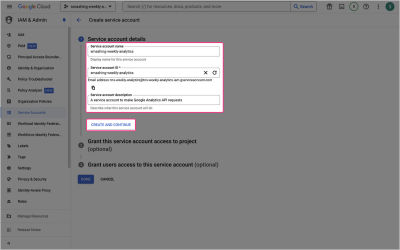
Service Account Details
On the next screen, give your Service account a name, ID, and description (optional). Then click CREATE AND CONTINUE.
In my example, I’ve given my service account a name and ID of smashing-weekly-analytics and added a short description that explains what the service account does.
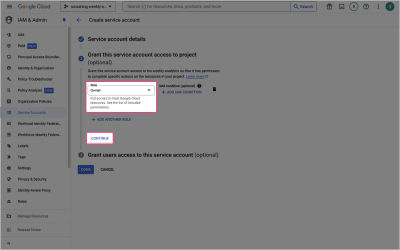
Service Account Role
On the next screen, select Owner for the Role, then click CONTINUE.
Service Account Done
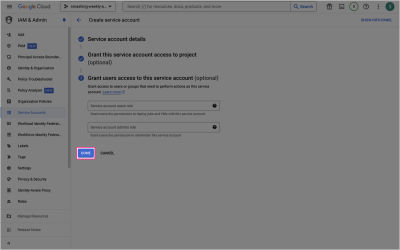
You can leave the fields blank in this last step and click DONE when you’re ready.
Service Account Keys
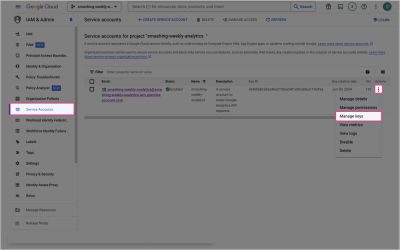
From the left-hand navigation, select Service Accounts, then click the “more dots” to open the menu and select Manage keys.
Service Accounts Add Key
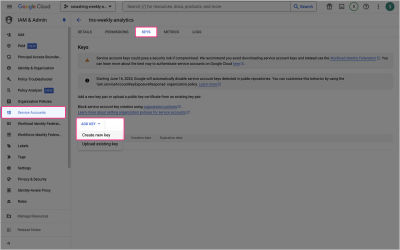
On the next screen, locate the KEYS tab at the top of the screen, then click ADD KEY and select Create new key.
Service Accounts Download Keys
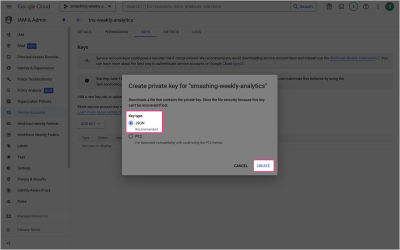
On the next screen, select JSON as the key type, then click CREATE to download your Google Application credentials .json file.
Google Application Credentials
If you open the .json file in your code editor, you should be looking at something similar to the one below.
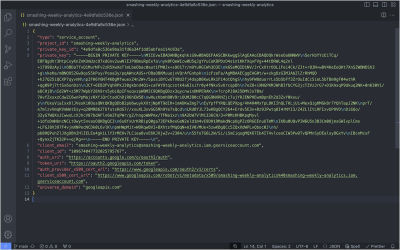
In case you’re wondering, no, you can’t use an object as a variable defined in an .env file. To use these credentials, it’s necessary to convert the whole file into a base64 string.
Note: I wrote a more detailed post about how to use Google Application credentials as environment variables here: “How to Use Google Application .json Credentials in Environment Variables.”
From your terminal, run the following: replace name-of-creds-file.json with the name of your .json file.
cat name-of-creds-file.json | base64
If you’ve already cloned the repo and followed the Getting started steps in the README, add the base64 string returned after running the above and add it to the GOOGLE_APPLICATION_CREDENTIALS_BASE64 variable in your .env file, but make sure you wrap the string with double quotation makes.
GOOGLE_APPLICATION_CREDENTIALS_BASE64="abc123"
That completes the Google project side of things. The next step is to add your service account email to your Google Analytics property and find your Google Analytics Property ID.
Google Analytics Properties
Whilst your service account now has access to the Google Analytics Data API, it doesn’t yet have access to your Google Analytics account.
Get Google Analytics Property ID
To make queries to the Google Analytics API, you’ll need to know your Property ID. You can find it by heading over to your Google Analytics account. Make sure you’re on the correct property (in the screenshot below, I’ve selected paulie.dev — GA4).
Click the admin cog in the bottom left-hand side of the screen, then click Property details.
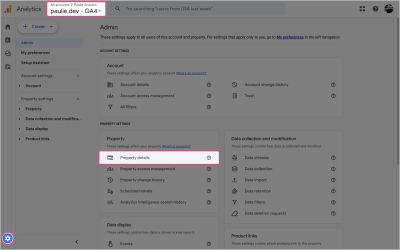
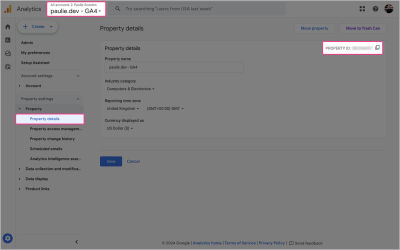
On the next screen, you’ll see the PROPERTY ID in the top right corner. If you’ve already cloned the repo and followed the Getting started steps in the README, add the property ID value to the GA4_PROPERTY_ID variable in your .env file.
Add Client Email to Google Analytics
From the Google application credential .json file you downloaded earlier, locate the client_email and copy the email address.
In my example, it looks like this: smashing-weekly-analytics@smashing-weekly-analytics.iam.gserviceaccount.com.
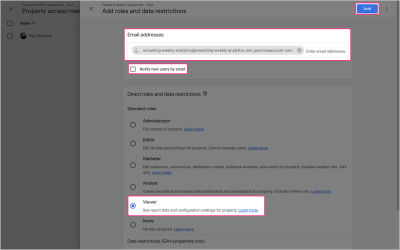
Now navigate to Property access management from the left hide side navigation and click the + in the top right-hand corner, then click Add users.
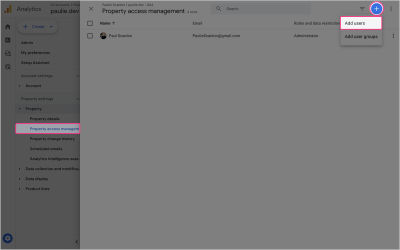
On the next screen, add the client_email to the Email addresses input, uncheck Notify new users by email, and select Viewer under Direct roles and data restrictions, then click Add.
That completes the Google Analytics properties section. Your “application” will use the Google application credentials containing the client_email and will now have access to your Google Analytics account via the Google Analytics Data API.
Slack Channels and Webhook
In the following steps, you’ll create a new Slack channel that will be used to post messages sent from your “application” using a Slack Webhook.
Creating The Slack Channel
Create a new channel in your Slack workspace. I’ve named mine #weekly-analytics-report. You’ll need to set this up before proceeding to the next step.
Creating a Slack App
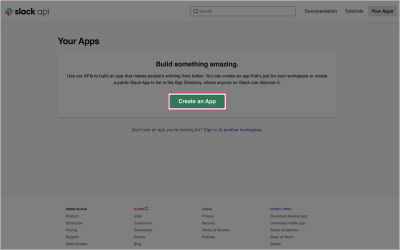
Head over to the slack api dashboard, and click Create an App.
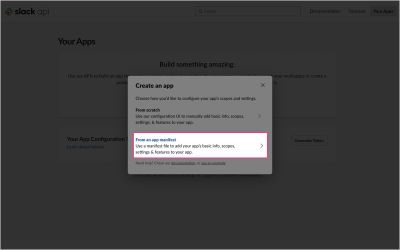
On the next screen, select From an app manifest.
On the next screen, select your Slack workspace, then click Next.
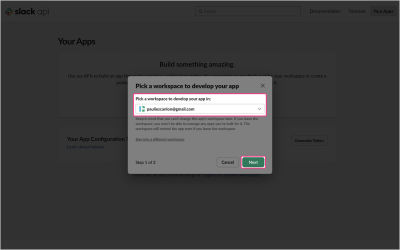
On this screen, you can give your app a name. In my example, I’ve named my Weekly Analytics Report. Click Next when you’re ready.
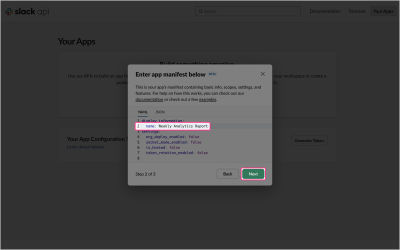
On step 3, you can just click Done.
With the App created, you can now set up a Webhook.
Creating a Slack Webhook
Navigate to Incoming Webhooks from the left-hand navigation, then switch the Toggle to On to activate incoming webhooks. Then, at the bottom of the screen, click Add New Webook to Workspace.
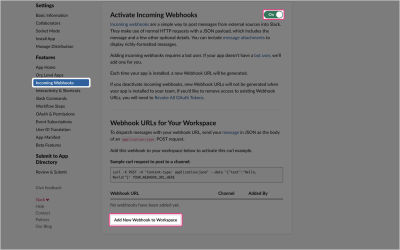
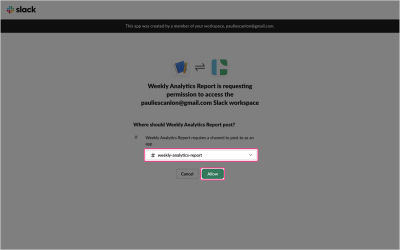
On the next screen, select your Slack workspace and a channel that you’d like to use to post messages, too, and click Allow.
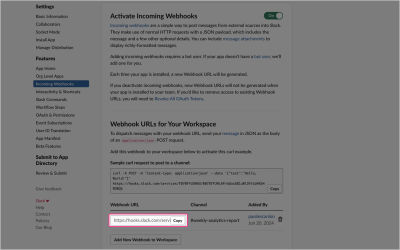
You should now see your new Slack Webhook with a copy button. Copy the Webhook URL, and if you’ve already cloned the repo and followed the Getting started steps in the README, add the Webhook URL to the SLACK_WEBHOOK_URL variable in your .env file.
Slack App Configuration
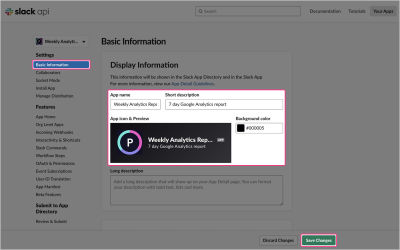
From the left-hand navigation, select Basic Information. On this screen, you can customize your app and add an icon and description. Be sure to click Save Changes when you’re done.
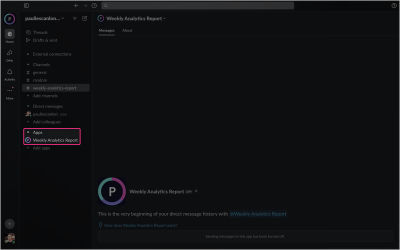
If you now head over to your Slack, you should see that your app has been added to your workspace.
That completes the Slack section of this article. It’s now time to add your environment variables to GitHub Secrets and run the workflow.
Add GitHub Secrets
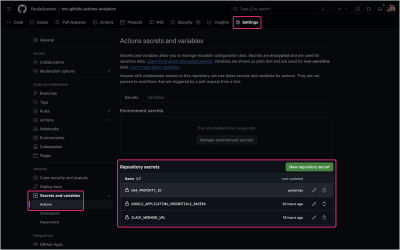
Head over to the Settings tab of your GitHub repository, then from the left-hand navigation, select Secrets and variables, then click Actions.
Add the three variables from your .env file under Repository secrets.
A note on the base64 string: You won’t need to include the double quotes!
Run Workflow
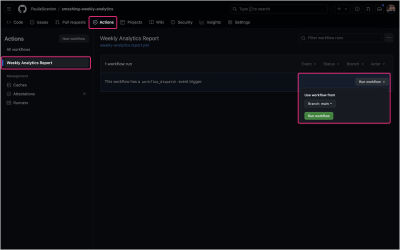
To test if your Action is working correctly, head over to the Actions tab of your GitHub repository, select the Job name (Weekly Analytics Report), then click Run workflow.
If everything worked correctly, you should now be looking at a nicely formatted list of the top ten page views on your site in Slack.
Finished
And that’s it! A fully automated Google Analytics report that posts directly to your Slack. I’ve worked in a few places where Google Analytics data was on lockdown, and I think this approach to sharing Analytics data with Slack (something everyone has access to) could be super valuable for various people in your organization.
(yk)

