

In this tutorial, you will learn how to create a pixel/grid displacement effect using Three.js, enhanced with shaders and GPGPU techniques. The guide covers the application of a subtle RGB shift effect that dynamically responds to cursor movement. By the end, you’ll gain a solid understanding of manipulating textures and creating interactive visual effects in WebGL, expanding your creative capabilities with Three.js.
It’s recommended that you have some basic understanding of Three.js and WebGL for understanding this tutorial. Let’s dive in!
The Setup
To create this effect, we will need two textures: the first is the image we want to apply the effect to, and the second is a texture containing the data for our effect. Here’s how the second texture will look:
First, we will create a basic Three.js plane with a ShaderMaterial that will display our image and add it to our Three.js scene.
createGeometry() {
    this.geometry = new THREE.PlaneGeometry(1, 1)
  }

  createMaterial() {
    this.material = new THREE.ShaderMaterial({
      vertexShader,
      fragmentShader,
      uniforms: {
        uTexture: new THREE.Uniform(new THREE.Vector4()),
        uContainerResolution: new THREE.Uniform(new THREE.Vector2(window.innerWidth, window.innerHeight)),
        uImageResolution: new THREE.Uniform(new THREE.Vector2()),
      },
    })
  }

  setTexture() {
    this.material.uniforms.uTexture.value = new THREE.TextureLoader().load(this.element.src, ({ image }) => {
      const { naturalWidth, naturalHeight } = image
      this.material.uniforms.uImageResolution.value = new THREE.Vector2(naturalWidth, naturalHeight)
    })
  }

  createMesh() {
    this.mesh = new THREE.Mesh(this.geometry, this.material)
  }
I passed the viewport dimensions to the uContainerResolution uniform because my mesh occupies the entire viewport space. If you want your image to have a different size, you will need to pass the width and height of the HTML element containing the image.
Here is the vertex shader code, which will remain unchanged since we are not going to modify the vertices.
varying vec2 vUv;

void main()
{
    vec4 modelPosition = modelMatrix * vec4(position, 1.0);
    vec4 viewPosition = viewMatrix * modelPosition;
    vec4 projectedPosition = projectionMatrix * viewPosition;
    gl_Position = projectedPosition;

    vUv=uv;
}
And here is the initial fragment shader:
uniform sampler2D uTexture;
varying vec2 vUv;
uniform vec2 uContainerResolution;
uniform vec2 uImageResolution;
vec2 coverUvs(vec2 imageRes,vec2 containerRes)
{
float imageAspectX = imageRes.x/imageRes.y;
float imageAspectY = imageRes.y/imageRes.x;
float containerAspectX = containerRes.x/containerRes.y;
float containerAspectY = containerRes.y/containerRes.x;
vec2 ratio = vec2(
min(containerAspectX / imageAspectX, 1.0),
min(containerAspectY / imageAspectY, 1.0)
);
vec2 newUvs = vec2(
vUv.x * ratio.x + (1.0 - ratio.x) * 0.5,
vUv.y * ratio.y + (1.0 - ratio.y) * 0.5
);
return newUvs;
}
void main()
{
vec2 newUvs = coverUvs(uImageResolution,uContainerResolution);
vec4 image = texture2D(uTexture,newUvs);
gl_FragColor = image;
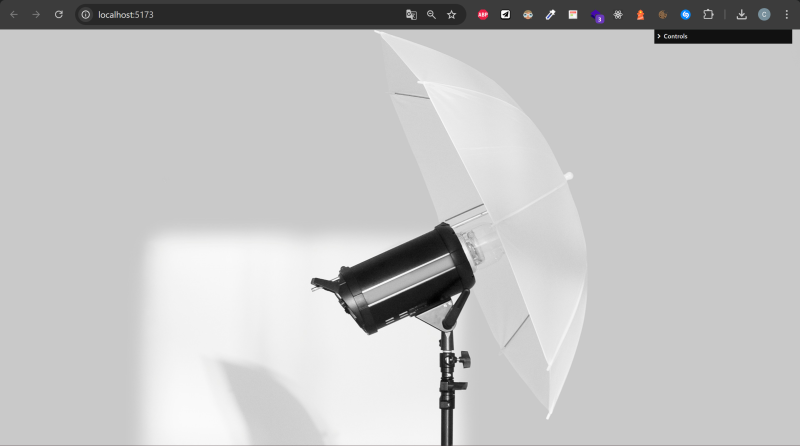
}The coverUvs function returns a set of UVs that will make the image texture wrap behave like the CSS object-fit: cover; property. Here is the result:
Implementing Displacement with GPGPU
Now we are going to implement the displacement texture in a separate shader, and there is a reason for this: we can’t rely on classic Three.js shaders to apply our effect.
As you saw in the video of the displacement texture, there is a trail following the mouse movement that slowly fades out when the mouse leaves the area. We can’t create this effect in our current shader because the data is not persistent. The shader runs at each frame using its initial inputs (uniforms and varyings), and there is no way to access the previous state.
Fortunately, Three.js provides a utility called GPUComputationRenderer. It allows us to output a computed fragment shader as a texture and use this texture as the input of our shader in the next frame. This is called a Buffer Texture. Here’s how it works:
First, we are going to initialize the GPUComputationRenderer instance. For that, I will create a class called GPGPU.
import fragmentShader from '../shaders/gpgpu/gpgpu.glsl'
// the fragment shader we are going to use in the gpgpu

// ...class constructor
createGPGPURenderer() {
    this.gpgpuRenderer = new GPUComputationRenderer(
      this.size, //the size of the grid we want to create, in the example the size is 27
      this.size,
      this.renderer //the WebGLRenderer we are using for our scene
    )
  }
  createDataTexture() {
    this.dataTexture = this.gpgpuRenderer.createTexture()
  }

  createVariable() {
    this.variable = this.gpgpuRenderer.addVariable('uGrid', fragmentShader, this.dataTexture)
    this.variable.material.uniforms.uGridSize = new THREE.Uniform(this.size)
    this.variable.material.uniforms.uMouse = new THREE.Uniform(new THREE.Vector2(0, 0))
    this.variable.material.uniforms.uDeltaMouse = new THREE.Uniform(new THREE.Vector2(0, 0))
  }

  setRendererDependencies() {
    this.gpgpuRenderer.setVariableDependencies(this.variable, [this.variable])
  }

  initiateRenderer() {
    this.gpgpuRenderer.init()
  }
This is pretty much a generic instantiation code for a GPUComputationRenderer instance.
- We create the instance in
createGPGPURenderer. - We create a
DataTextureobject increateDataTexture, which will be populated with the result of the computed shader. - We create a “variable” in
createVariable. This term is used byGPUComputationRendererto refer to the texture we are going to output. I guess it’s called that because our texture is going to vary at each frame according to our computations. - We set the dependencies of the GPGPU.
- We initialize our instance.
Now we are going to create the fragment shader that our GPGPU will use.
void main()
{
vec2 uv = gl_FragCoord.xy/resolution.xy;
vec4 color = texture(uGrid,uv);
color.r = 1.;
gl_FragColor = color;
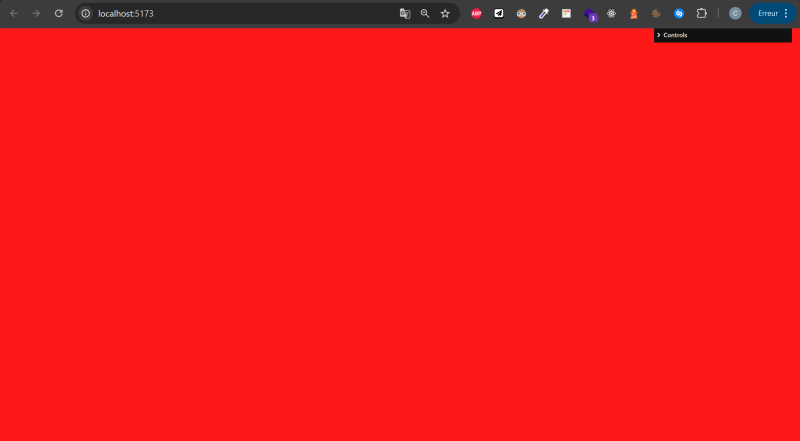
}The current texture that our GPGPU is creating is a plain red image. Notice that we did not have to declare uniform sampler2D uGrid in the header of the shader because we declared it as a variable of the GPUComputationRenderer instance.
Now we are going to retrieve the texture and apply it to our image.
Here is the complete code for our GPGPU class.
constructor({ renderer, scene }: Props) {
    this.scene = scene
    this.renderer = renderer

    this.params = {
      size: 700,
    }

    this.size = Math.ceil(Math.sqrt(this.params.size))
    this.time = 0

    this.createGPGPURenderer()
    this.createDataTexture()
    this.createVariable()
    this.setRendererDependencies()
    this.initiateRenderer()
  }

  createGPGPURenderer() {
    this.gpgpuRenderer = new GPUComputationRenderer(
      this.size, //the size of the grid we want to create, in the example the size is 27
      this.size,
      this.renderer //the WebGLRenderer we are using for our scene
    )
  }
  createDataTexture() {
    this.dataTexture = this.gpgpuRenderer.createTexture()
  }

  createVariable() {
    this.variable = this.gpgpuRenderer.addVariable('uGrid', fragmentShader, this.dataTexture)
    this.variable.material.uniforms.uGridSize = new THREE.Uniform(this.size)
    this.variable.material.uniforms.uMouse = new THREE.Uniform(new THREE.Vector2(0, 0))
    this.variable.material.uniforms.uDeltaMouse = new THREE.Uniform(new THREE.Vector2(0, 0))
  }

  setRendererDependencies() {
    this.gpgpuRenderer.setVariableDependencies(this.variable, [this.variable])
  }

  initiateRenderer() {
    this.gpgpuRenderer.init()
  }


  getTexture() {
    return this.gpgpuRenderer.getCurrentRenderTarget(this.variable).textures[0]
  }

  render() {
    this.gpgpuRenderer.compute()
  }
The render method will be called each frame, and the getTexture method will return our computed texture.
In the material of the first plane we created, we will add a uGrid uniform. This uniform will contain the texture retrieved by the GPGPU.
createMaterial() {
    this.material = new THREE.ShaderMaterial({
      vertexShader,
      fragmentShader,
      uniforms: {
        uTexture: new THREE.Uniform(new THREE.Vector4()),
        uContainerResolution: new THREE.Uniform(new THREE.Vector2(window.innerWidth, window.innerHeight)),
        uImageResolution: new THREE.Uniform(new THREE.Vector2()),


        //add this new Uniform
        uGrid: new THREE.Uniform(new THREE.Vector4()),
      },
    })
  }
Now we are going to update this uniform in each frame after computing the GPGPU texture,
render() {
    this.gpgpu.render()
    this.material.uniforms.uGrid.value = this.gpgpu.getTexture()
}
Now, inside the fragment shader of our first image plane, let’s display this texture.
uniform sampler2D uGrid;

void main()
{
    vec2 newUvs = coverUvs(uImageResolution,uContainerResolution);

    vec4 image = texture2D(uTexture,newUvs);
    vec4 displacement = texture2D(uGrid,newUvs);

    gl_FragColor = displacement;
}
You should see this result. This is exactly what we want. Remember, all our GPGPU is doing for now is setting an empty texture to red.
Handling Mouse Movement
Now we are going to start working on the displacement effect. First, we need to track mouse movement and pass it as a uniform to the GPGPU shader.
We will create a Raycaster and pass the mouse UVs to the GPGPU. Since we only have one mesh in our scene for this example, the only UVs it will return will be those of our plane containing the image.
createRayCaster() {
    this.raycaster = new THREE.Raycaster()
    this.mouse = new THREE.Vector2()
  }

  onMouseMove(event: MouseEvent) {
    this.mouse.x = (event.clientX / window.innerWidth) * 2 - 1
    this.mouse.y = -(event.clientY / window.innerHeight) * 2 + 1

    this.raycaster.setFromCamera(this.mouse, this.camera)

    const intersects = this.raycaster.intersectObjects(this.scene.children)
    const target = intersects[0]
    if (target && 'material' in target.object) {
      const targetMesh = intersects[0].object as THREE.Mesh

      if(targetMesh && target.uv)
      {
        this.gpgpu.updateMouse(target.uv)
      }
    }
  }

  addEventListeners() {
    window.addEventListener('mousemove', this.onMouseMove.bind(this))
  }
Remember that in the createVariable method of the GPGPU, we assigned it a uniform uMouse. We are going to update this uniform in the updateMouse method of the GPGPU class. We will also update the uDeltaMouse uniform (we will need it soon).
updateMouse(uv: THREE.Vector2) {

    const current = this.variable.material.uniforms.uMouse.value as THREE.Vector2

    current.subVectors(uv, current)

    this.variable.material.uniforms.uDeltaMouse.value = current
    this.variable.material.uniforms.uMouse.value = uv
  }
Now, in the GPGPU fragment shader, we will retrieve the mouse coordinates to calculate the distance between each pixel of the texture and the mouse. We will then apply the mouse delta to the texture based on this distance.
uniform vec2 uMouse;
uniform vec2 uDeltaMouse;


void main()
{
    vec2 uv = gl_FragCoord.xy/resolution.xy;

    vec4 color = texture(uGrid,uv);

    float dist = distance(uv,uMouse);
    dist = 1.-(smoothstep(0.,0.22,dist));


    color.rg+=uDeltaMouse*dist;

    gl_FragColor = color;
}
You should get something like this:
Notice that when you move your cursor from left to right, it’s coloring, and when you move it from right to left, you are erasing. This is because the delta of the UVs is negative when you go from right to left and positive the other way around.
You can kind of see where this is going. Obviously, we are not going to display our displacement texture; we want to apply it to our initial image. The current texture we have is far from perfect, so we won’t use it yet, but you can already test it on our image if you want!
Try this in the fragment shader of your plane:
void main()
{
    vec2 newUvs = coverUvs(uImageResolution,uContainerResolution);

    vec4 image = texture2D(uTexture,newUvs);
    vec4 displacement = texture2D(uGrid,newUvs);

    vec2 finalUvs = newUvs - displacement.rg*0.01;

    vec4 finalImage = texture2D(uTexture,finalUvs);

    gl_FragColor = finalImage;
}
Here’s what you should get:
The first problem is that the shape of the displacement is not a square. This is because we are using the same UVs for our displacement as for the image. To fix this, we are going to give our displacement its own UVs using our coverUvs function.
void main()
{
    vec2 newUvs = coverUvs(uImageResolution,uContainerResolution);
    vec2 squareUvs = coverUvs(vec2(1.),uContainerResolution);

    vec4 image = texture2D(uTexture,newUvs);
    vec4 displacement = texture2D(uGrid,squareUvs);

    vec2 finalUvs = newUvs - displacement.rg*0.01;

    vec4 finalImage = texture2D(uTexture,finalUvs);

    gl_FragColor = finalImage;
}
Now you should have a square-shaped displacement. You can display our texture again since we still need to work on it. In the gl_FragColor of the plane shader, set the value back to displacement.
The biggest issue you can clearly see with our current texture is that it’s not fading out. To fix that, we are going to multiply the color by a value smaller than 1, which will cause it to progressively tend to 0.
//... gpgpu shader
color.rg+=uDeltaMouse*dist;

float uRelaxation =  0.965;
color.rg*=uRelaxation;

gl_FragColor = color;
Now it’s a little bit better, but still not perfect. The pixels that are closer to the cursor take a lot more time to fade out. This is because they have accumulated much more color, so they take longer to reach 0. To fix this, we are going to add a new float uniform.
Add this at the bottom of the createVariable method of the GPGPU:
this.variable.material.uniforms.uMouseMove = new THREE.Uniform(0)Then add this at the top of updateMouse:
updateMouse(uv: THREE.Vector2) {
  this.variable.material.uniforms.uMouseMove.value = 1
// ... gpgpu.updateMouse
Then, add this to the render method of the GPGPU:
render() {
    this.variable.material.uniforms.uMouseMove.value *= 0.95
    this.variable.material.uniforms.uDeltaMouse.value.multiplyScalar(0.965)

    this.gpgpuRenderer.compute()
  }
Now you might notice that the colors are very weak. This is because the value of uDeltaMouse is fading out too quickly. We need to increase it in the updateMouse method:
updateMouse(uv: THREE.Vector2) {
    this.variable.material.uniforms.uMouseMove.value = 1

    const current = this.variable.material.uniforms.uMouse.value as THREE.Vector2

    current.subVectors(uv, current)
    current.multiplyScalar(80)

    this.variable.material.uniforms.uDeltaMouse.value = current
    this.variable.material.uniforms.uMouse.value = uv
  }
Now we have our desired displacement effect:
Creating the RGB Shift Effect
All that’s left to do is the RGB shift effect. Understanding this effect is pretty simple. You probably know that a color in GLSL is a vec3 containing the red, green, and blue components of a fragment. What we are going to do is apply the displacement to each individual color of our image, but with different intensities. This way, we will notice a shift between the colors.
In the fragment shader of the plane, add this code right before the gl_FragColor = finalImage;
/*
* rgb shift
*/

//separate set of UVs for each color
vec2 redUvs = finalUvs;
vec2 blueUvs = finalUvs;
vec2 greenUvs = finalUvs;

//The shift will follow the displacement direction but with a reduced intensity,
//we need the effect to be subtle
vec2 shift = displacement.rg*0.001;

//The shift strength will depend on the speed of the mouse move,
//since the intensity rely on deltaMouse we just have to use the length of the (red,green) vector
float displacementStrength=length(displacement.rg);
displacementStrength = clamp(displacementStrength,0.,2.);

//We apply different strengths to each color

float redStrength = 1.+displacementStrength*0.25;
redUvs += shift*redStrength;

float blueStrength = 1.+displacementStrength*1.5;
blueUvs += shift*blueStrength;

float greenStrength = 1.+displacementStrength*2.;
greenUvs += shift*greenStrength;


float red = texture2D(uTexture,redUvs).r;
float blue = texture2D(uTexture,blueUvs).b;
float green = texture2D(uTexture,greenUvs).g;

//we apply the shift effect to our image
finalImage.r =red;
finalImage.g =green;
finalImage.b =blue;


gl_FragColor = finalImage;
And now we have our effect!
Thanks for reading!