SVGator has gone through a series of updates since our last article, which was published in 2021, when it was already considered to be the most advanced web-based tool for vector animation. The first step toward more versatile software came with the mobile export feature that made it possible to implement the animations in iOS and Android applications.
The animation tool continued its upgrade with a series of new export options: video formats including MP4, AVI, MKV, MOV, and WebM, as well as image formats such as GIF, Animated PNG, WebP, and image sequence. By covering a larger area of users’ needs, the app now enables anyone to create animated stickers, social media, and newsletter animations, video assets, and many more types of visual content on demand.
The goal of becoming a “one tool for all” still lacked the last piece of the puzzle, namely full support for Lottie files. Lottie, just like SVG, is a vector-based format, but it has even better comprehensive multi-platform support, a fact that makes it super popular among developers and design professionals. It is built for use across various platforms, enabling smooth integration into both web and mobile applications. Its file size is minimal, it is infinitely scalable, and developers find it straightforward to implement once they get familiar with the format. Lottie can incorporate raster graphics and also supports interactivity.
SVGator’s latest version has everything you need for your various applications without the need for any third-party apps or plug-ins.
Note: You can test all of SVGator’s functionalities free of charge before committing to the Pro plan. However, you can export up to three watermarked files, with videos and GIFs limited to basic quality.
In this article, we will follow a creation process made of these steps:
- Importing an existent Lottie JSON and making some minor adjustments;
- Importing new animated assets created with SVGator (using the library);
- Creating and animating new elements from scratch;
- Exporting the Lottie animation.
Getting Started With SVGator
The sign-up process is simple, fast, and straightforward, and no credit card is required. Sign up either with Google or Facebook or, alternatively, by providing your name, email address, and password. Start a project either with a Lottie animation or a static SVG. If you don’t have an existing file, you can design and animate everything starting from a blank canvas.
Now that you’ve created your account, let’s dive right into the fun part. Here’s a preview of how your animation is going to look by the time you’re done following this guide. Neat, right?
Create A New Project
After logging in and clicking on the New Project option, you will be taken to the New Project Panel, where you can choose between starting from a blank project or uploading a file. Let’s start this project with an existing Lottie JSON.

- Click on the Upload file button and navigate to the directory where you have saved your Lottie file.

(Large preview) - Select the “Fast response.json” file and click Open.
Hit play in the editor, and the animation should look like this:

(Large preview)
Note: Make sure to hit Save after each step to make sure you don’t lose any of your progress while working on this project alongside our guide.
Import An Animated Asset
In this step, you will learn how to use the Library to import new assets to your project. You can easily choose from a variety of ready-made SVGs stored in different categories, load new files from your computer (Lottie, static SVG, and images), or save animations from other SVGator projects and reuse them.
In this case, let’s use an animated message bubble previously created and saved to the Uploads section of the Library.
Learn how to create and save animated assets with this short video tutorial.
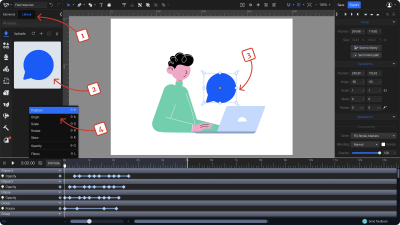
- Navigate to the left sidebar of the app and switch to the Library tab, then click the “+” icon to upload the message bubble asset that you downloaded earlier.
- After it is loaded in the uploads section, simply click on it to add it to your project.
All the animated properties of the asset are now present in the timeline, and you can edit them if you want.
Note: Make sure the playhead is at the second “0” before adding the animated asset. When adding an animated asset, it will always start animating from the point where the playhead is placed.
- Freely adjust its position and size as you wish.
- With the playhead at the second 0, click on the Animate button, then choose Position.
At this point, you should have the first Position keyframe automatically added at the second 0, and you are ready to start animating.
Animate The Message Bubble
- Start by dragging the playhead on the timeline at 0.2 seconds:

(Large preview) - Then, drag the message bubble up a few pixels. The second keyframe will appear in the timeline, marking the element’s new position, thus creating the 2 milliseconds animation.
Note: You can hit Play at any moment to check how everything looks!
Next, you can use the Scale animator to make the bubble disappear after the dots representing the typing are done animating by scaling it down to 0 for both the X and Y axes:

(Large preview) - With the message bubble still selected, drag the playhead at 2.2 seconds, click on Animate, and select Scale (or just press Shift + S on the keyboard) to set the first Scale keyframe, then drag the playhead at 2.5 seconds.
- Set the scale properties to 0 for both the X and Y axes (in the right side panel). The bubble won’t be visible anymore at this point.
Note: To maintain the ratio while changing the scale values, make sure you have the Maintain proportions on (the link icon next to the scale inputs).
To add an extra touch of interest to this scaling motion, add an easing function preset:

(Large preview) - First, jump back to the first Scale keyframe (you can also double-click the keyframe to jump the playhead right at it).
- Open the Easing Panel next to the time indicator and scroll down through the presets list, then select Ease in Back. Due to its bezier going out of the graph, this easing function will create a bounce-back effect for the scale animation.
Note: You can adjust the bezier of a selected easing preset and create a new custom function, which will appear at the top of the list.
Keep in mind that you need at least one keyframe selected if you intend to apply an easing. The easing function will apply from the selected keyframe toward the next keyframe at its right. Of course, you can apply a certain easing for multiple keyframes at once.
To get a smoother transition when the message bubble disappears, add an Opacity animation of one millisecond at the end of the scaling:

(Large preview) - Choose Opacity from the animators’ list and set the first keyframe at 2.4 seconds, then drag the playhead at 2.5 seconds to match the ending keyframe from the scale animation above.
- From the Appearance panel, drag the Opacity slider all the way to the left, at 0%.
Create An Email Icon
For the concept behind this animation to be complete, let’s create (and later animate) a “new email” notification as a response to the character sending that message.
Once again, SVGator’s asset library comes in handy for this step:
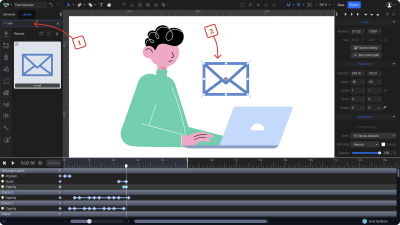
- Go to the search bar from the Library and type in “mail,” then click on the mail asset from the results.
- Place it somewhere above the laptop. Edit the mail icon to better fit the style of the animation:

(Large preview) - Open the email group and select the rectangle from the back.
- Change its fill color to a dark purple.
- Round up the corners using the Radius slider.
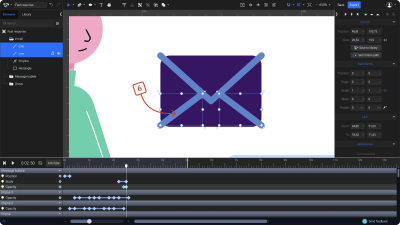
(Large preview) - Make the element’s design minimal by deleting these two lines from the lower part of the envelope.

(Large preview) - Select the envelope seal flap, which is the Polyline element in the group, above the rectangle.
- Add a lighter purple for the fill, set the stroke to 2 px width, and also make it white.
To make the animation even more interesting, create a notification alert in the top-right corner of the envelope:
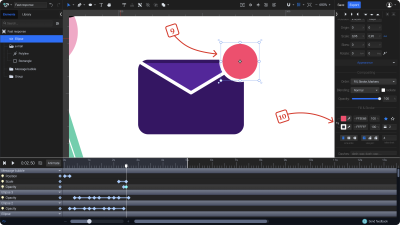
(Large preview) - Use the Ellipse tool (O) from the toolbar on top and draw a circle in the top-right corner of the envelope.
- Choose a nice red color for the fill, and set the stroke to white with a 2 px width.
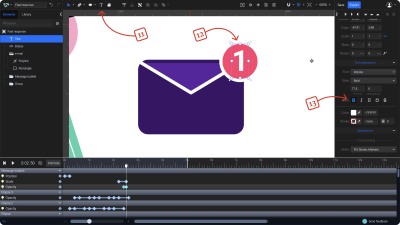
(Large preview) - Click on the “T” icon to select the Text tool.
- Click on the circle and type “1”.
- Set the color to white and click on the “B” icon to make it bold.
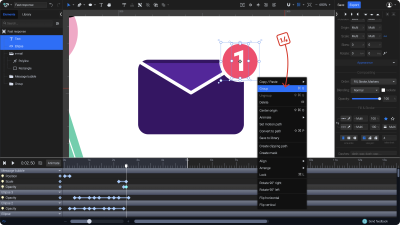
(Large preview) - Select both the red circle and the number, and group them: right-click, and hit Group.
You can also hit Command or Ctrl + G on your keyboard. Double-click on the newly created group to rename it to “Notification.”

(Large preview) - Select both the notification group and email group below and create a new group, which you can name “new email.”
Animate The New Email Group
Let’s animate the new email popping out of the laptop right after the character has finished texting his message:

- With the “New email” group selected, click twice on the Move down icon from the header to place the group last.
You can also press Command or Ctrl + arrow down on your keyboard. - Drag the group behind the laptop (on the canvas) to hide it entirely, and also scale it down a little.
- With the playhead at 3 seconds, add the animators Scale and Position.
You can also do that by pressing Shift + S and Shift + P on your keyboard.
(Large preview) - Drag the playhead at the second 3.3 on the timeline.
- Move the New Email group above the laptop and scale it up a bit.
- You can also bend the motion path line to create a curved trajectory for the position animation.
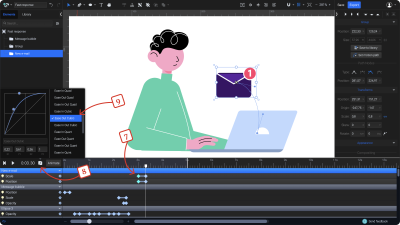
(Large preview) - Select the first keyframes at the second 3.
- Open the easing panel.
- And click on the Ease Out Cubic preset to add it to both keyframes.
Animate The Notification
Let’s animate the notification dot separately. We’ll make it pop in while the email group shows up.
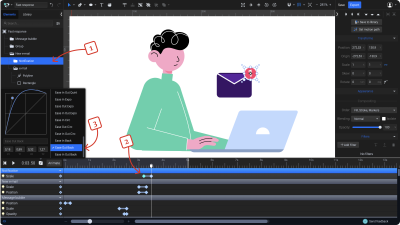
- Select the Notification group.
- Create a scale-up animation for it with 0 for both the X and Y axes at 3.2 and 1 at 3.5 seconds.
- Select the first keyframe and, from the easing panel, choose Ease Out Back. This easing function will ensure the popping effect.
Add Expressiveness To The Character
Make the character smile while looking at the email that just popped out. For this, you need to animate the stroke offset of the mouth:
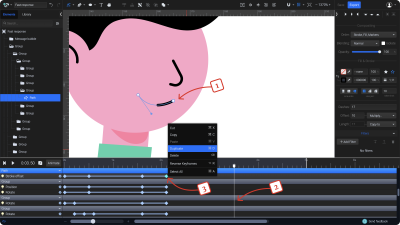
- Select the mouth path. You can use the Node tool to select it directly with one click.
- Drag the playhead at 3.5 seconds, which is the moment from where the smile will start.
- Select the last keyframe of the Stroke offset animator from the timeline and duplicate it at second 3.5, or you can also use Ctrl or Cmd + D for duplication.
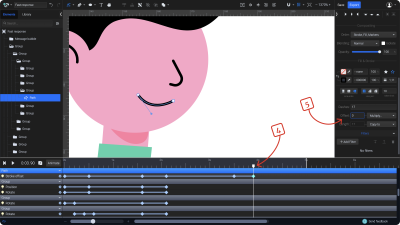
(Large preview) - Drag the playhead at second 3.9.
- Go to the properties panel and set the Offset to 0. The stroke will now fill the path all the way, creating a stroke offset animation of 4 milliseconds.
Final Edits
You can still make all kinds of adjustments to your animation before exporting it. In this case, let’s change the color of the initial Lottie animation we used to start this project:

- Use the Node tool to select all the green paths that form the character’s arms and torso.
- Change the color as you desire.
Export Lottie
Once you’re done editing, you can export the animation by clicking on the top right Export button and selecting the Lottie format. Alternatively, you can press Command or Ctrl + E on your keyboard to jump directly to the export panel, from where you can still select the animation you want to export.
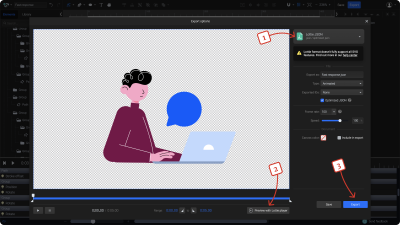
- Make sure the Lottie format is selected from the dropdown. In the export panel, you can set a name for the file you are about to export, choose the frame rate and animation speed, or set a background color.
- You can preview the Lottie animation with a Lottie player.
Note: This step is recommended to make sure all animations are supported in the Lottie format by previewing it on a webpage using the Lottie player. The preview in the export panel isn’t an actual Lottie animation. - Get back to the export panel and simply click Export to download the Lottie JSON.
Final Thoughts
Now that you’re done with your animation don’t forget that you have plenty of export options available besides Lottie. You can post the same project on social media in video format, export it as an SVG animation for the web, or turn it into a GIF sticker or any other type of visual you can think of. GIF animations can also be used in Figma presentations and prototypes as a high-fidelity preview of the production-ready Lottie file.
We hope you enjoyed this article and that it will inspire you to create amazing Lottie animations in your next project.
Below, you can find a few useful resources to continue your journey with SVG and SVGator:
- SVGator tutorials
Check out a series of short video tutorials to help you get started with SVGator. - SVGator Help Center
It answers the most common questions about SVGator, its features, and membership plans.
(yk, il)

